
Ri-KB-2 Keypad
1. Description
The Ri-KB-2 is a wireless membrane keypad designed for controlling the RiDom smart home system. It is intended for indoor installation and is not protected against precipitation or low temperatures. The keypad allows users to change the security mode when it is not possible to control the RiDom system via a smartphone. When a user-specific code is entered, the keypad controls the security settings for those premises to which that particular user has access.
Key Functions:
- Arms and disarms the premises;
- Supports silent alarm activation when a duress code is entered.
The Ri-KB-2 operates exclusively with the RiDom system. Integration with third-party security systems is not supported. It connects to the Ri-HUB control center using the secure Ri-Contact-R protocol.
Configuration of the keypad is performed through the RiDom mobile application, available for both iOS and Android smartphones.
2. Appearance (Functional Elements)
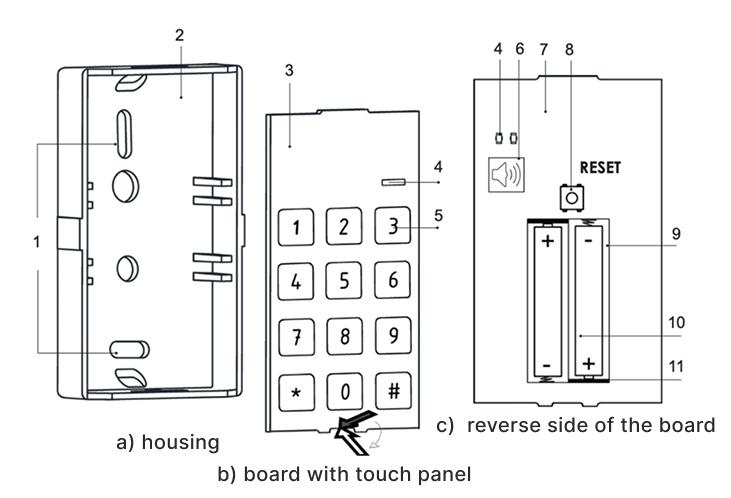
1 – Mounting holes
2 – Housing
3 – Membrane keypad
4 – Status LED indicator
5 – Keys
6 – Status LED indicator (item 4 viewed from the rear)
7 – Sound indicator (buzzer)
8 – Printed circuit board (PCB)
9 – RESET button
10 – Battery compartment
11 – Batteries
12 – Battery insulators
3. Operating Principle
The Ri-KB-2 controls the security modes of the entire facility as well as individual premises. The keypad supports a silent alarm function — this allows a user to signal to the security monitoring company that they are being forced to disarm the system, without triggering sirens or notifications in the RiDom app.
Security modes can be controlled via the Ri-KB-2 using access codes.
The Ri-KB-2 supports codes ranging from 2 to 5 digits in length. Code entry must be confirmed by pressing the # key.
4. Ri-Contact-R Data Transmission Protocol
To transmit events and alarms, the keypad utilizes the Ri-Contact-R radio protocol. This is a two-way wireless data transmission protocol that ensures fast and reliable communication between the Ri-HUB control center and connected devices.
Ri-Contact-R supports device encryption and authentication during every communication session to prevent sabotage and device spoofing. The protocol includes regular device polling by the control center at intervals ranging from 10 seconds to 10 minutes (configurable in the mobile app) to monitor connectivity with all devices and display their statuses in the mobile application.
5. Event Transmission to the Security Monitoring Station
The RiDom system can transmit alarms to a Centralized Monitoring Station (CMS) via the RiCoder security server, using the SurGard (Contact ID) protocol formats.
Upon receiving an alarm, the operator at the security monitoring station is informed that an alarm has occurred in the specific premises associated with the keypad (security zone) and takes appropriate action.
An alarm is transmitted using a key combination: simultaneously holding down the * + # keys for at least 3 seconds.
More about the "Panic Button" mode.
6. Keypad Placement
6.1. Selecting a Location for the Keypad
When choosing a location for the Ri-KB-2, consider the distance from the Ri-HUB and any obstacles between the devices that may block the radio signal, such as walls, inter-floor ceilings, or large objects located within the premises.
The device is intended for indoor installation only.
Do not install the keypad:
- Near radio transmitting devices, including those operating on 2G/3G/4G mobile networks, Wi-Fi routers, walkie-talkies, radio stations, or the R-HUB itself (which operates on the GSM network).
- In immediate proximity to electrical wiring.
- Near metal objects and mirrors that cause radio signal attenuation or shielding.
- Outside the premises (outdoors).
- In rooms where temperature and humidity exceed permissible limits.
- Closer than 1 meter to the Ri-HUB.
Check the radio signal level at the intended installation site. More about assessing radio link quality.
If moving the device does not resolve a low or unstable signal level, use a security system radio signal repeater.
6.2. Radio Link Quality Assessment
Radio link quality assessment is a function used to check the signal level between the Ri-KB-2 keypad and the hub, helping you select the optimal installation location.
Why it is needed
- To ensure reliable command transmission before final mounting.
- To avoid "dead zones" and false triggers caused by poor connectivity.
- To determine if a signal repeater is required.
How to check
- Press the
#key. - The status LED will blink several times depending on the connection quality:
- 🟢 3 blinks: Excellent (installation permitted)
- 🟢 2 blinks: Good (installation permitted)
- 🟢 1 blink: Connection established (it is recommended to choose a different location or add a repeater)
- 🔴 4 blinks: No connection (installation impossible)
Important Nuances
Test Mode: The check is initiated manually by pressing the # key. In normal operation mode, the indicator does not constantly display the signal level.
Interpretation: Even a single green signal indicates that a connection is technically possible; however, for stable security system operation, it is recommended to aim for 2 or 3 blinks.
Red Signal: Indicates a complete lack of connection. Move the keypad closer to the Ri-HUB or remove physical obstacles (metal structures, thick walls).
7. Connecting to the Control Center
7.1. Before You Begin
- Turn on the Ri-HUB and check its internet connection. For Ri-HUB Ultra and Ri-HUB Pro, the RiDom logo glows green; for Ri-HUB-1, the network status LEDs are lit.
- Install the RiDom app. Create an account, add the Ri-HUB to the app, and create at least one premise (room).
- Ensure that the Ri-HUB is not armed and is not currently updating. Check the status of the control center in the RiDom app.
7.2. How to Connect the Keypad to the Ri-HUB
- Open the RiDom app. In the "My Devices" tab, tap
 , then select the "Ri-KB-2" keypad from the device list and follow the on-screen instructions.
 - Following the prompt in the app, remove the battery insulators.
- The keypad will periodically flash its indicator green, indicating that it is in "Pairing" mode.
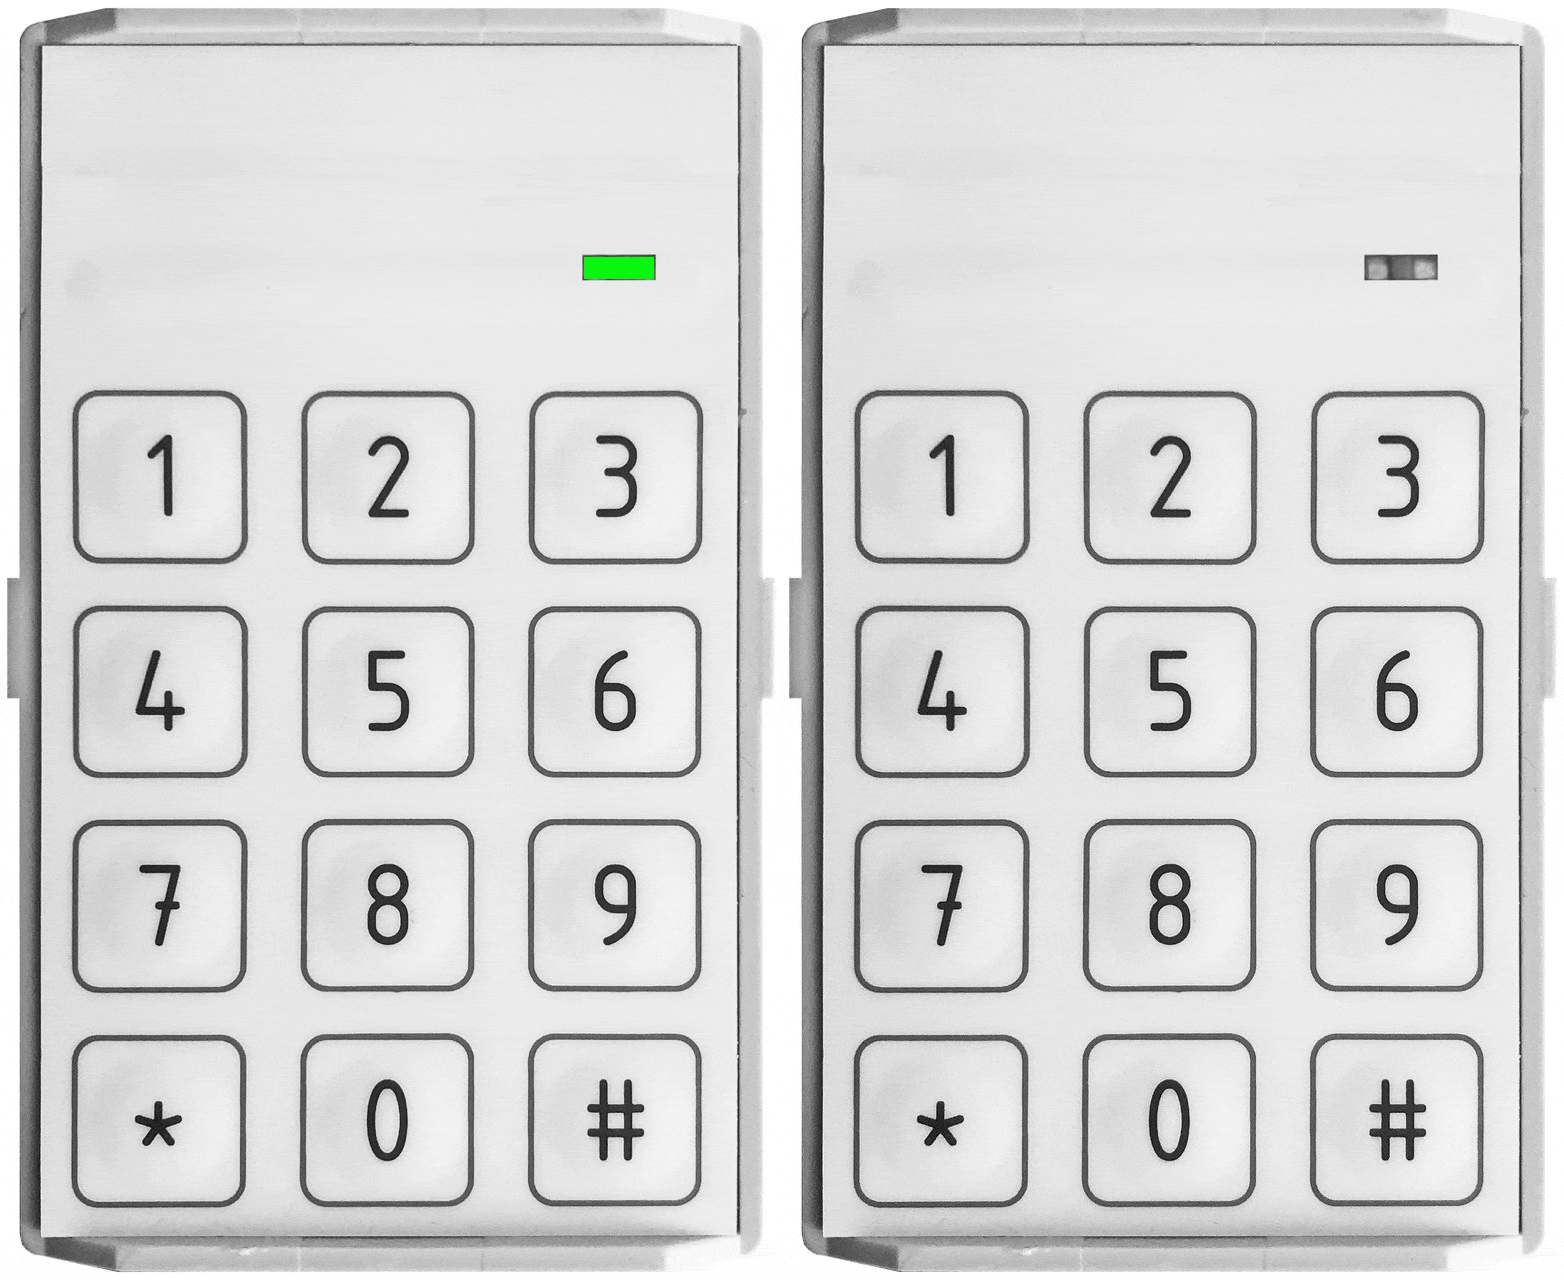
- Upon successful connection to the hub, the keypad's indicator will light up red for 2 seconds. Afterward, you will be able to see the keypad in the app, along with all its data.
foto
The "Pairing" mode is limited to 100 seconds. To resume "Pairing" mode, press the RESET button (position 9 in the figure).
For the Ri-KB-2 to be detected and paired with the Ri-HUB, the keypad must be within the range of the control center's wireless network.
A connection request to the Ri-HUB is transmitted only at the moment the device is powered on. If the connection to the Ri-HUB fails, the keypad will automatically turn off after 5 seconds. You can then repeat the connection attempt.
The added device will appear in the Ri-HUB device list. The update frequency of device statuses in the list depends on the polling interval set in the Ri-HUB settings; the default value is 36 seconds.
8. Keypad Operation Modes Control
8.1. Security Control
If a personal code is used for arming — in the Ri-HUB event log, as well as in notifications — the name of the user who disarmed or armed the home/facility is displayed.
Command | Combination |
Arm |
|
Disarm | code -> |
Check security status |
|
Check disarm permissions from keypad |
|
8.2. Alarms
The Duress Code allows you to simulate turning off the alarm. In this case, neither the RiDom app nor the sirens installed on the premises will give you away. When a duress code is used, users receive a standard notification about its activation without triggering an alarm signal, while the security monitoring company receives an alarm notification indicating the use of a duress code.
Command | Combination |
Enter duress code |
|
Press "Panic Button" |
|
9. Operation Mode Indication
9.1. "Pairing" Mode
Pairing is the process of registering the Ri-KB-2 keypad in the RiDom system to establish a wireless connection with the Ri-HUB control center.
Why it is needed
- To add the keypad to the RiDom security system;
- To configure data exchange via the radio channel between the keypad and the Ri-HUB;
- To authorize the device for security control.
How it works
- Start: After removing the battery insulators or pressing the RESET button, the keypad enters pairing mode.
- Searching for Ri-HUB: The green indicator (pos. 4) blinks periodically — the keypad is sending a request to the control center.
animation
- Success: The red indicator lights up for 2 seconds — the device is registered.
(Image text translation: "Pairing complete!")
- Done: The keypad appears in the RiDom app.
Mode duration: 100 seconds, after which it automatically exits the mode. To re-enter, press RESET.
9.2. Battery Status
Battery Status is a visual indication of the Ri-KB-2 keypad's power level, which activates upon pressing any key.
Why it is needed
- To quickly check the battery charge without opening the RiDom app;
- To replace the batteries in time before the device shuts down completely.
How it works
- Battery OK: Press any key -> the indicator blinks 🟢 green 1 time.
- Battery Low: Press any key -> the indicator blinks 🔴 red 1 time.
Important Parameters
Battery Type: 2 x AAA (Lithium FR03 recommended);
Service Life: Up to 12 months under normal climatic conditions and with an average usage frequency of twice a day.
9.3. Security Control
Security Control is the process of arming and disarming the security system, as well as triggering an emergency alarm using the Ri-KB-2 keypad.
Why it is needed
- To arm and disarm the security mode without using a smartphone;
- To urgently transmit an alarm signal to the Ri-HUB;
9.3.1. Arming
- Press
*, enter the code, press#.
image
2. After 2 seconds, a sound signal will sound and the indicator will blink green for 60 seconds.
(Image text translation: "60 sec")
When arming from the mobile app or a key fob, the keypad emits a sound signal for 2 seconds after a time interval that depends on the keypad's communication wake-up time.
9.3.2. Disarming
- Enter the code, press the
#key.
image
- After 2 seconds, a sound signal will sound and the indicator will blink green for 2 seconds.
When arming from the mobile app or a key fob, the keypad emits a sound signal for 2 seconds after a time interval that depends on the keypad's communication wake-up time.
9.3.3. Combination Entry Error
Possible causes: The entered code is not assigned to any user in the RiDom app.
Entry error: After 3 seconds, the sound indicator will beep for 4 seconds; the light indicator will not light up.
9.3.4. Security Status
- Press the
0key, then#.
Armed – after 2 seconds, the indicator will blink 🔴 red for 2 seconds, without sound.
Disarmed – after 2 seconds, the indicator will blink 🟢 green for 2 seconds, without sound.
9.3.5. Keypad Disarm Permissions
- Press the
1key, then#.
Allowed – after 2 seconds, the indicator will blink 🟢 green for 2 seconds, without sound.
Forbidden – the indicator will blink green-red.
9.4. Keypad Parameter Control
Parameter Control is the configuration of the Ri-KB-2 keypad's sound indication using special key combinations.
Why it is needed
- To enable or disable sound signals when operating the keypad;
- To adapt the device to operating conditions (e.g., turn off sound at night).
How it works
Sound indication is enabled by default.
To change the state, use the following commands:
- Enable Sound: Hold down the
*+7keys for at least 2 seconds; the indicator will blink red and a signal will sound.
image
- Disable Sound: Hold down the
*+8keys for at least 2 seconds; the indicator will blink red without sound.
Important Parameters
Hold Duration: Combinations must be pressed simultaneously and held strictly for no less than 2 seconds. A short press will not work.
Feedback: Upon successful parameter change, the keypad always provides a light signal (red indicator). If sound was enabled, it will also emit a short confirmation beep.
Buffer Reset: If more than 5 seconds pass without action after starting to enter a combination, the buffer is cleared (the indicator blinks red 3 times with sound), and the command must be entered again.
10. Device States in the RiDom App
10.1. States on the Device Card
The status of the keypad can be assessed by the icons on the device card. To access the keypad card, follow these steps:
- Select the desired home/facility.
- Go to the My Devices section.
- Select the keypad.
image
Parameter | Value |
Device online | The card is displayed in its normal view |
Device offline | The card is displayed dimmed (grayed out) |
Malfunction present | A malfunction indication is shown |
Device in transitional state | A special status state is shown |
10.2. Keypad Settings in the Mobile App
Keypad configuration is performed in the "My Devices" section, on the "Keypad" device card.
image
Setting / Information Field | Value |
Device Name | The name displayed in the RiDom app to identify the keypad. Can be changed. |
Location | Selection of a virtual room (zone) in the RiDom system to which the device is assigned. Affects alarm triggering logic and zone control. |
Channel Name | Input Device – default name, can be changed. |
Broadcast Period | The time interval at which the keypad sends service packets (pings) to the Ri-HUB to maintain connectivity. |
Number of Broadcast Attempts | The number of retransmission attempts for a command in case of connection loss. |
Force Sensor Off | Forced disabling and enabling of the keypad at the Ri-HUB control center. |
11. Code Configuration
The Ri-KB-2 does not have preset codes. Before using the keypad, you must set the necessary codes for users in the RiDom app: a personal user code and a duress code.
The RiDom system allows you to set personal codes for users added to the Ri-HUB. If you attempt to add an existing code, the app will display an error message.
After adding the keypad to the RiDom system, assigning it to a specific room does not restrict the user from controlling the security of other specific rooms. A personal code controls the security of those rooms associated with that user.
If you need to use a general access code for unregistered users, you must create a separate local user in the RiDom app and specify the shared codes for them.
11.1. How to Set a Personal Code for a Registered User
For a mobile user (roles: owner, invited user)
Each mobile user sets their own personal code individually.
- Select the desired home on the My Homes screen.
- Tap the menu icon
 .
. - Tap Personal Access Codes in the Home Management section.
image
For a local user (keypad and key fob users)
️ The home/facility owner or a mobile user with permission to manage users sets the personal code.
- Select the desired home on the My Homes screen.
- Tap the menu icon .
- Tap Home Users in the Home Management section.
- Select the local user for whom you need to configure the code.
- Tap Local Access Codes (for keypad) in the User Settings section.
image
11.2. How to Set a Duress Code for the Keypad
For a mobile user (roles: owner, invited user)
The process of setting a duress code is similar to setting a personal code. More details...
For a local user (keypad and key fob users)
The process of setting a duress code is similar to setting a personal code. More details...
Related Articles
Update date: 09/21/2026
No comments to display
No comments to display