
Obtaining an access token for Yandex.Disk
If you have an account, proceed to the next step of the instructions Obtaining an access token for Yandex.Disk.
If you don’t have an account, go to the page Yandex ID and click Register. More information about registering an account in Yandex ID documentation.
Obtaining an access token for Yandex.Disk
A special access key (OAuth token) allows the RiCoder service to work with data in the Yandex ecosystem. The token is valid for 1 year. To receive a token, you must register an OAuth application in Yandex and receive a token for it.
1 Registering an OAuth application
1.1. Login to your Yandex account and log in.
1.2. Open the application creation page
https://oauth.yandex.ru/client/new/.
The Yandex service will offer to go through verification at State Services several times. This requirement is not necessary for RiCoder backup to work. Close the window.
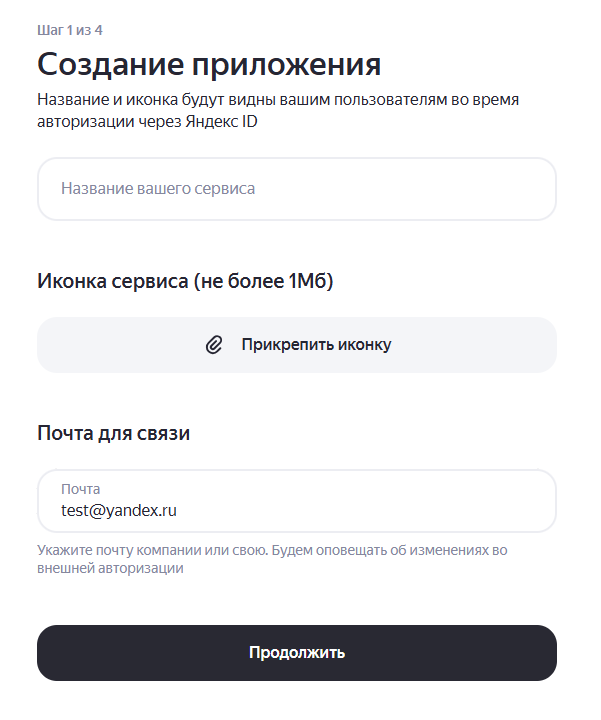
1.3. Step 1: Provide application information and click Continue:
- Enter the name of the application (for example: chop_backup).
- Check your email for contact.
- If necessary, attach an icon for the service.
OAth screen. Creating an application
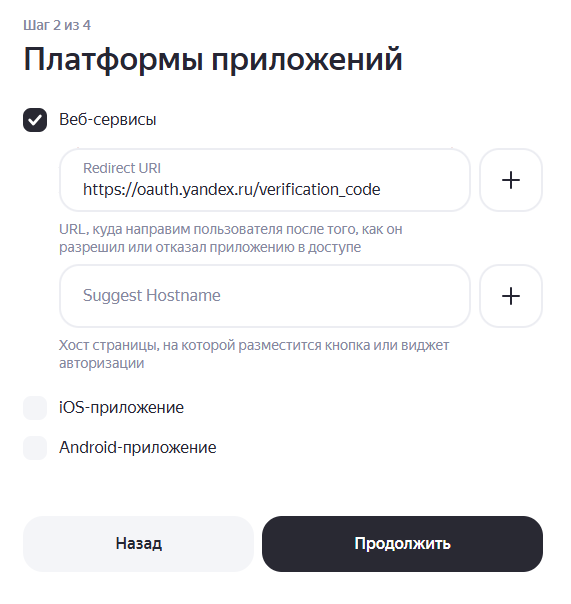
specify their parameters and click Continue.
- Select the Web services platform.
- In the Redirect URI field, enter the default URL:
https://oauth.yandex.ru/verification_code
OAuth screen. Application platforms
In field Access name Enter the access names one by one and add them to the list below:
- cloud_api:disk.write - write anywhere on the disk
- cloud_api:disk.read - reading the entire Disk
- cloud_api:disk.app_folder - access to the application folder on Disk
- cloud_api:disk.info - access to information about the Disk.
Click Continue.
OAuth screen. Permissions

OAuth screen. Application

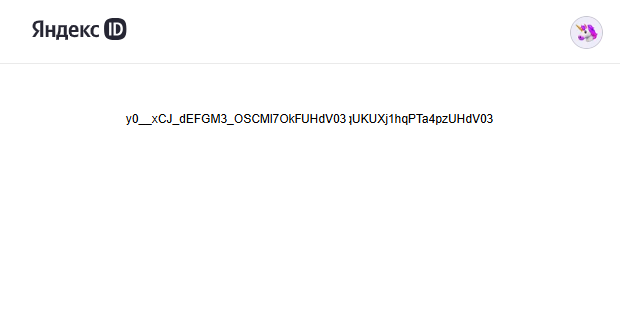
2. Obtaining an OAuth token to access Yandex.Disk manually
Save the received token. Service [Yandex OAuth](https://oauth.yandex.ru/) does not store issued tokens in public access. You will not be able to find them in your personal account. If you did not save the token, you can manually retrieve it again.
2.1. Follow the link:
https://oauth.yandex.ru/authorize?response_type=token&client_id=<ClientID
2.2. Instead of <ClientID> in the browser address bar, paste the value ClientID, copied from item 1.7.
2.3. Go through the Yandex ID authorization procedure if the token is issued to the application for the first time.
2.4. The OAuth token page for your application appears.
OAuth token screen
2.6. Create a text file (for example: token.txt) and paste the token value into it.
Save the file to the /CHOP\_DEPLOY/ folder after unpacking the RiCoder installation wizard archive. More details in section [Preparing to install RiCoder](https://wiki.ridom.ru/books/instructions-in-english/page/working-with-the-ricoder-installation-wizard).
If the token is lost, repeat steps 2.1 – 2.4 of this section to generate a new one. Do not transfer the file with the token to third parties.
Update date: 09/12/2025
Нет комментариев для отображения
Нет комментариев для отображения