
Working with the RiCoder Installation Wizard
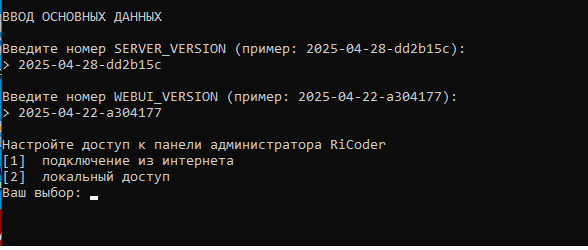
Entering basic data for installing RiCoder
Follow the steps suggested by the installation wizard.
1. Select the dialogue language from the proposed list: English / Russian
2. Make sure that the conditions for a successful download are met:
3. Сlick Enter.
4. Enter the file name and extension of the registration key (e.g., cloud-key-TestCHOP.json), which is located in the CHOP_DEPLOY folder.
RiCoder Installation Wizard Screen
Файл регистрационного ключа ключа можно переименовать после получения, но при установке или обновлении RiCoder обязательно укажите его точное имя с расширением.
5. Select the connection method to RiCoder admin panel remote access within the organization's local network or localhost.
Select the value remote access within the organization’s local network to be able to connect to the administrator’s web panel from any computer located in the organization’s local network. If you select the value local access (localhost) the web administrator panel will be available only on the server where RiCoder is installed.
RiCoder Installation Wizard screen
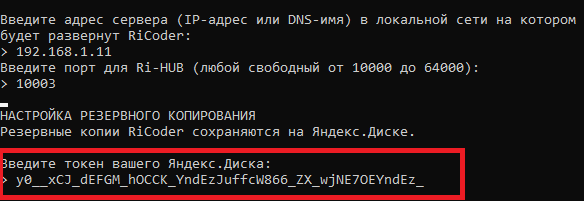
6. Enter the server IP address or DNS name (for example: chop.domen.ru) in the local network of the organization on which RiCoder will be deployed.
- When filling out the RiCoder registration form in the RiDom registry, the public host and port to connect the Ri-HUB control center to the RiCoder installed in the organization. The public port is uploaded to Ri-HUB.
- When installing RiCoder on an organization's server, the installation wizard specifies the server port on the local network of the organization that will use the RiCoder container to receive events from the Ri-HUB control center(s).
- The public port for connecting the Ri-HUB control center(s) on sites to the RiCoder server in the organization may differ from the port number that the RiCoder container uses to receive events from Ri-HUB.
Ways to find out the server IP address in Windows 10/11
Via the command line using the ipconfig command:
1. Open the command line → enter the command ipconfig.
2. Copy the IPv4 address (usually in the Ethernet or Wi-Fi section).
Through network parameters:
1. Open Options Windows OS→ Network and Internet.
2. Select Ethernet or Wi-Fi → Connection properties.
3. Find the line IPv4 -address - server IP address.
7. Select any free server port for connecting Ri-HUB control centers in the range from 10000 to 65535 and enter its number. Default port: 10003, unless a different value is specified in the installation wizard.
Before entering the port number, make sure that the selected port is not occupied by other processes.
1. Open a command prompt.
2. Enter the command netstat -an.
3. Check the list of ports. Ports with the status LISTENING are busy. Choose any one without the LISTENING status - this guarantees the successful installation of RiCoder.
- When installing RiCoder on a server together with other software (for example: together with a monitoring station), be sure to use different port values for these programs. Otherwise, an error will occur when installing RiCoder.
- Ports 2180, 8080, 10003, 22002 - RiCoder uses by default. If necessary, ports 2180, 8080, 10003 can be changed in the RiCoder settings. Port 22002 - does not change.
Setting up RiCoder database backup
RiCoder backups are saved on Yandex.Disk. To implement programmatic access to Yandex.Disk, you need Yandex Token (Oauth token) and a Yandex account. More information about obtaining a Yandex account and a token in the section Obtaining an access token to Yandex.Disk.
8. Copy and paste your Yandex.Disk token.
Installation Wizard screen
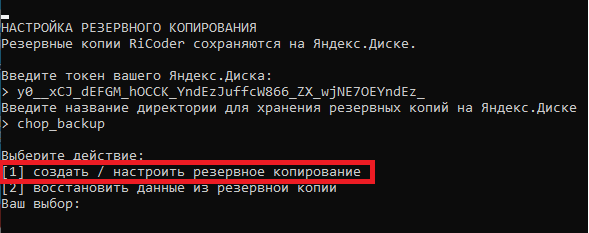
9. Enter the name of the directory for storing backups on Yandex.Disk.
Upon initial input, the directory will be created on Yandex.Disk. - If the directory already exists, then the files will be written to the specified directory. - You can use nested directories. Specify the path to the desired directory via **/**. For example: backup/sub\_backup.
10. Select Create / configure backup and click 1.
Installation Wizard screen
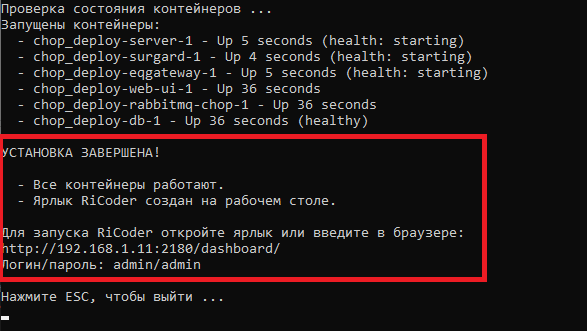
11. All necessary data for installing RiCoder has been entered. Wait until the containers are loaded and configured.
The installation wizard report displays the status of running containers and their loading times for reference.
If the download is successful, a successful installation message will appear:
Installation Wizard screen
More details about launching the RiCoder admin web panel in the section Running RiCoder. If an error was made when entering data -> close the installation wizard -> open it again and enter the correct data.
If the download was unsuccessful, a message from the installation wizard will appear:
- Error
- Error loading docker-compose: Something went wrong...**
- **\[ERROR\]**
- others Detailed description of errors is presented in the document **Possible errors and solutions when installing RiCoder software**. You can download the document on [official RiCoder page](https://ridom.ru/ricoder/).
13. Make sure that the backup was created on your Yandex.Disk.
- Log in Yandex.Disk.
- Find the directory that you specified in the installation wizard dialog. The folder contains a backup file (for example: 2025-07-04_13-54-36.dump), created during the installation of RiCoder.
If the directory with backup copies is not on Yandex.Disk, then check whether you entered the Yandex.Disk token correctly in the installation wizard dialog. Close and run the installation wizard again, enter all token characters correctly.
14. Close the installation wizard.
Do not remove the installation wizard from the server. You will need it for future RiCoder updates. More details in [RiCoder update](https://wiki.ridom.ru/books/instructions-in-english/page/ricoder-software-update)**.**
Update date: 05/22/2026
Нет комментариев для отображения
Нет комментариев для отображения