
RiCoder Backup
This article describes how to configure and use the built-in RiCoder backup mechanism with Yandex Disk: how to create, update, and restore a backup using the installation wizard, what limitations apply, and how to avoid restore errors.
1. Introduction
RiCoder creates backups using Docker containers. The result is a .dump archive file containing a full snapshot of all data, settings, and events at the moment of backup. This file is not a working database, but it allows full recovery after failures or unsuccessful updates.
How backup works
- Backup configuration is done in the RiCoder installation wizard.
- A backup archive (dump file) is created manually when running the RiCoder installation wizard.
- A backup contains:
- RiCoder settings.
- Database data for all connected objects.
- Archive of unsent events existing in the system at backup time.
- RiCoder can be updated safely without data loss.
- The system can be restored after an unsuccessful update.
Limitations
Automatic rotation of dump files is not available in the current RiCoder version: old copies are not deleted automatically. For large datasets, it is recommended to:
- Periodically delete old dump files manually.
- Monitor free space on Yandex Disk.
2. Preparation
To use RiCoder backup to Yandex Disk, you need:
- A Yandex account. How to create an account.
- A Yandex Disk access token. How to get a token.
- Installation prerequisites: download and unpack the RiCoder distribution, start Docker, and place the JSON key in
CHOP_DEPLOY. See Windows and Linux.
Backup directory on Yandex Disk
RiCoder saves dump files to this directory. You can:
- Create the directory during wizard execution (the wizard will create it).
- Create the directory in advance on Yandex Disk and enter its name in the wizard.
- Use any existing Yandex Disk directory.
**Directory naming recommendation** Use a simple name without spaces or special characters, for example: `RiCoder_Backups`.
3. Usage Scenarios
- Initial RiCoder installation with backup configuration. Details.
- Changing backup settings (folder name, Yandex Disk token). Details.
- Restoring a backup. Details.
3.1 Initial backup setup
Initial setup is performed during first RiCoder installation on the server. Follow the installation flow for Windows or Linux.
3.2 Changing backup settings
When to change Yandex Disk settings using the RiCoder installation wizard:
- Create a new backup folder on Yandex Disk.
- Rename an existing directory.
- Yandex Disk token expired (1 year).
- Switch to another Yandex Disk account.
In all these cases:
- Run the RiCoder installation wizard in update mode. RiCoder update procedure.
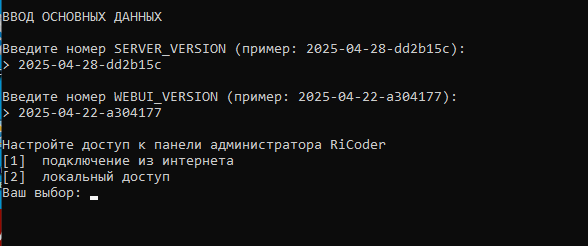
- Enter current RiCoder settings in Main data input.
RiCoder installation wizard screen: General settings
- In Backup configuration, enter new Yandex Disk parameters.
Installation wizard screen: Backup configuration
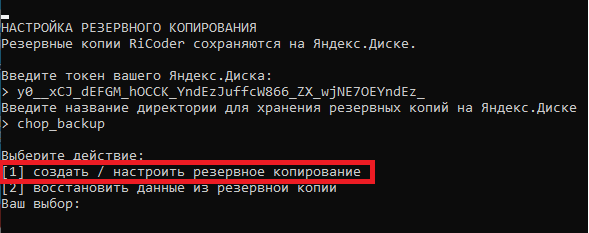
- Choose action [1] create / configure backup.
Backup settings change scenarios in RiCoder
| Situation | Preparation | What to enter in the wizard |
|---|---|---|
| Create a new Yandex Disk directory | None | Enter a new directory name |
| Rename existing directory | None | Enter a new directory name. A new directory is created; the old one is not deleted |
| Yandex Disk token expired (1 year) | Get a new token for the current account (details) | Copy and paste the new token |
| Switch Yandex Disk account | Get a token for the new account (details) | Copy and paste the new token |
3.3 Restoring from backup
**Important!** Restore only an up-to-date backup copy. Using an outdated dump file may cause data conflicts and RiCoder operation errors. Before restoring, ensure the selected copy matches the latest stable system state.
To restore a RiCoder backup from your Yandex Disk, use the same installation wizard used for server installation.
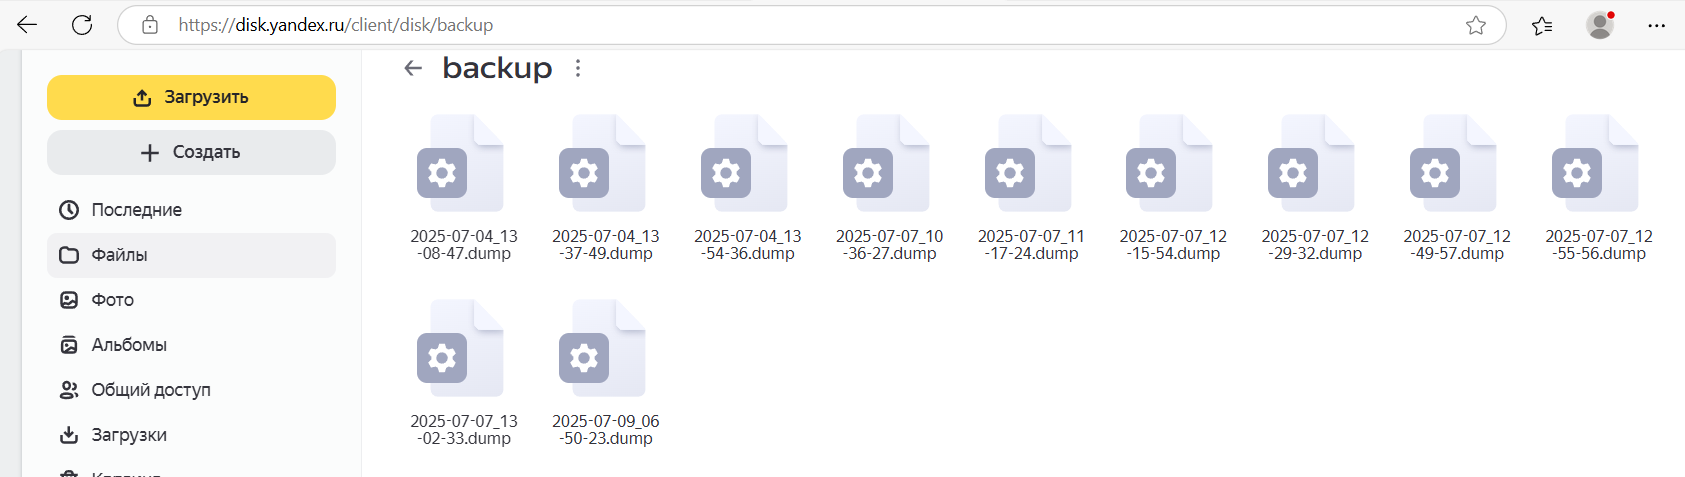
- Open Yandex Disk backup directory and copy the required backup file name.
Yandex Disk screen
- Ensure Docker Desktop is running (Engine status is running).
- Find the folder containing the RiCoder installation wizard:
\CHOP_DEPLOY\. - Run launcher_windows.exe.
- Select installation language and press Enter after the info message.
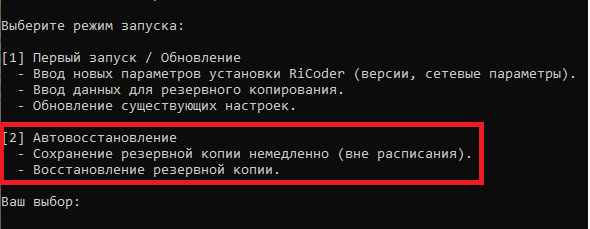
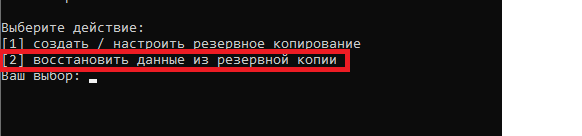
- Select Auto-recovery mode. Enter 2.
RiCoder installation wizard screen
- Select restore data from backup.
RiCoder installation wizard screen
- Enter the backup file name and press Enter.
- Wait until reboot and container setup are complete, then close the installation wizard.
- Open the RiCoder admin web panel from the desktop shortcut and verify data restoration.
3.4 RiCoder update
Before updating RiCoder, create a backup of current settings and database.
4. Opting out of Yandex Disk backup
RiCoder saves backups to Yandex Disk. If you need another backup method, contact your manager.
To skip Yandex Disk backup setup, leave fields in Backup configuration empty in the installation wizard dialog.
Last updated: 29.01.2026
Нет комментариев для отображения
Нет комментариев для отображения